How to set up your own RSS feed
-
Create a notepad file and upload the code below with your details to your website
0(0)0(0)<?xml version="1.0" encoding="UTF-8" ?>
<rss version="2.0">
<channel>
<title>Your website name</title>
<link>https://www.yourdomain.com</link>
<description>Description of what you do</description>
<item>
<title>Episode/news 1</title>
<link>https://www.episode/newsurl1.com/xml/xml_rss.asp</link>
<description>New RSS tutorial on W3Schools</description>
</item>
<item>
<title>Episode/news 2</title>
<link>https://www.episode/newsurl2.com/xml</link>
<description>New XML tutorial on W3Schools</description>
</item>
</channel>
</rss>More infos
-
Show the RSS button to your website
0(0)0(0)Every Wordpress website has a built-in RSS feed, which just needs to be activated. What you need to do is to add /feed after the URL and you will see the feed. Now, what you need to do is to make the RSS button visible. For example, you can install a social media plug-in like UltimatelySocial (click here to visit their website) and then activate the RSS button.
Alternatively, you may create a widget as shown in the video below:
More infos
-
Watch the tutorial below
0(0)0(0)- Go to ‘Extensions’ and click on ‘Module Manager’:
- In the top left-hand corner of the page, click ‘New’:
- Select a module type like ‘Syndication Feeds’:
- Fill in the title, feed format as RSS 2.0 and select the position where you'd like to show the module:
- Apply the RSS feed.
- Select all pages, if you wish to show all the website content in your RSS Feed:
- Click ‘Save’ to save the RSS feed module.
More infos
Like Solutionbay?
Also check out our other projects :) See all projects -
Watch the video below
0(0)0(0)More infos
-
Follow the steps below
0(0)0(0)-
Enter your blog's web address in the "Ready to Burn?" form which is found on FeedBurner's home page and at the bottom of the pages in the Blog and Podcast sections. If you plan to publish a podcast with your Blogger feed, check the "I am a podcaster" box. Click Next ».
The Identify Feed Source page should appear.
-
On "Welcome", set the title and FeedBurner URL address of your new feed you prefer.
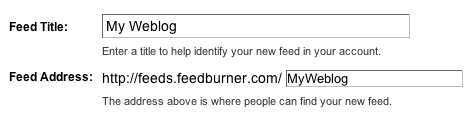
The Create or Sign In To Your FeedBurner Account page should appear.
-
Create a FeedBurner account on this page.
When you've supplied all the required information on this page, click Activate Feed.
-
Read all of the information on "Congrats", then click Next to continue with the setup process.
-
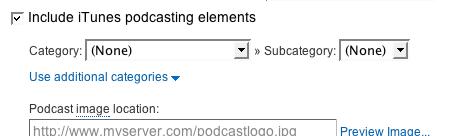
If you selected "I am a podcaster" on the home page, configuration options for the SmartCast service will appear. Here you can supply categories and other information for iTunes, append a copyright message, and submit your podcast.
When you are finished, click Next. Configuration options for FeedBurner stats services should appear.
-
On the stats configuration page, select the level of feed stats detail you want.
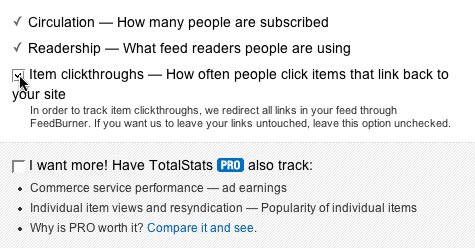
Click Next to finish the setup process and enter the feed management interface.
You're now ready to make your FeedBurner feed available on your Blogger site!
Source: https://support.google.com/feedburner/answer/78465?hl=en
More infos
-
-
Follow the instructions below
0(0)0(0)- Click on the Wix Blog app in the editor and click on Settings.
- Click on the Add-Ons tab and click Add to Page beside Custom Feed.
- Select the page you want the feed to appear on.
- Drag the feed to position it on the page.
More infos
-
Read the instructions below
0(0)0(0)The RSS feed is enabled by default, and adding /rss should grant you access to it. In case if it isn't enabled, follow the steps below:
- Log into Tumblr and click on the options icon (the cog) at the top of the dashboard.
- Click the "Truncate RSS feed" box under the "RSS feed" heading
* If you want to show snippets of posts in the RSS feed rather than the full content, on the "Redirect this blog's RSS to a FeedBurner URL. * If you want to point the RSS feed to the FeedBurner service where it can be processed further. - Click on "Save" to confirm.
- Click on "Customize" to open the theme editor and check the preview on the right side to see if the RSS link is already included in the theme structure. If it isn't, che the settings on the left side to display this link. If no options are availablem you need to add the link manually.
- Click in the "Description" box if you wish to place the RSS link in the description text, or click on "Edit HTML" to enter the RSS link in a specific section of the theme. Enter /rss">yourrssfeedhere.
- Click on "Save" to save the changes you made.
More infos
- Log into Tumblr and click on the options icon (the cog) at the top of the dashboard.
-
Type .atom at the end of the URL
0(0)0(0)Shopify automatically creates an RSS feed, which you may find by adding .atom at the end of the feed.
e.g. http://store.myshopify.com/blogs/blogname.atom
More infos
Like Solutionbay?
Also check out our other projects :) See all projects -
Find the RSS feed
0(0)0(0)Unlike on most websites, the RSS feed is automatically created and updated, therefore, you don't need to worry about creating an RSS feed.
Check out the don't know where to find the RSS feed URL of a website to learn how to find the RSS feed.
More infos
-
Go through the steps below
0(0)0(0)- Log into your Magento Admin Panel and navigate to System > Configuration:
- Select RSS Feeds, in the Configuration panel, under Catalog;
- Set Enable RSS to ‘Enable' under the config section;
- In the Wishlist section set Enable RSS to ‘Enable’.
In the Catalog section set any or all of the following feeds to ‘Enable’.
- Tags Products – the tags products RSS feed manages and syndicates newly added product tags.
- New Products – the new products RSS feed tracks new products added to the store catalog and syndicates them.
- Coupons/Discounts – any special coupons or discounts generated in your store will be added to this RSS feed.
- Special Products – the special products RSS feed will syndicate products with special pricing.
- Top Level Category – This RSS feed tracks new top level categories or root level categories in your catalog.
- Click the ‘Save Config’ button to save the changes:
Note: In the Order section set Customer Order Status Notification to ‘Enable’. It will allow customers to track their order status with an RSS feed. When enabled, the RSS feed link will appear on the order information page once an order is created.
Source: https://www.templatemonster.com/help/magento-how-to-set-up-rss-feeds.html
More infos

Login to Solutionbay
Join Solutionbay
Please click on the confirmation link we just sent you to
If you don’t receive the email in the next 2 minutes please check your junk folder, and add [email protected] to your safe sender list.